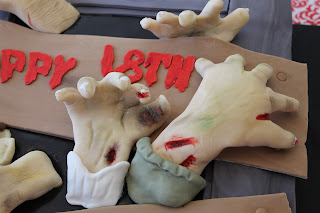
Tutorial on how make a Zombie Hand.
I just recently made a Zombie cake and wanted to quickly put out a post on how to make a Zombie hand or any hand in general really.
Here are some tools that you will need:
- Petal Dusts (not luster dust unless you want your hand sparkly and shiny--not really a zombie feature, but I guess if you are doing a fairy or something girly that would work.) The petal dust colors I used were Daffodil (a light yellow), Sage (green), Cocoa (brown), and a little bit of Charcoal (black). You don't have to have these exact colors but you want something similar to those colors to get the zombie effect.
- White and Red americolor food coloring. White for painting the nails--so they are a different color than the hand. The red to add into the wounds to look like blood.
- Paint brushes in various sizes. A nice puffy one to spread color over the general area and small ones to get in cracks and creases. And some in between to add detail.
- Bottle opener (to open the petal dust with out hurting your hand).
- Some powdered sugar or corn starch to keep the hands from sticking to the counter when drying.
- Some tylose powder (which you mix into your fondant which helps it to harden quicker. You can use gumpaste instead of fondant that is mixed with tylose, but I like fondant better.
- Some flesh colored fondant ( I used some ivory fondant that I added a tiny bit of terracotta coloring (by Americolor)
- And some foam pads and flower formers (or what ever you have that can help give the hands a curve. You can also scrunch up Saran Wrap and paper towels as well. I use the foam pads so the hands stay curved and don't flatten.
Ok lets get started. You start off with a ball of your colored fondant. (The size depends on how big you want the hand to be, remember you need part of it to be the wrist so make it bigger than you think.)
Roll the ball into a tear drop shape. (It is on the pink pad so it is easier for you to see.
Then flatten the tear drop shape with your fondant smoother or the palm of your hand (Do not flatten on the pad, it is just on the pad to be seen better.).
Then use a knife, or exacto blade to cut the thumb about 1/4 of the way across the top, which is the wider side. Make sure if you are making multiple hands that the thumb is on the other side of some of the hands. You don't want to only have right hands on your cake.
Then make three more cuts for the other fingers.
Then start to individually elongate and smooth the fingers. (If you are making a zombie then they don't have to be perfect. Cracks look great. And if you have a finger that really doesn't look good just cut it off and make it a bloody stump! hehehe
Make an indentation at the base of the thumb for where your hand curves into your wrist. I looked at my own hand before doing this to give me an idea where to do it.
Use a piping tip 12 to make the finger nails at the tip of each finger.
Here is what the finger nail looks like. Make sure the tip 12 partially hangs off the finger so you don't just get a circle on top.
Then pinch the top tip of the nail to make some pointy scary zombie nails.
Add some wounds to the hand.
Lay it down in what ever position you want the hand to dry in. After it has dried for an 1/2 hour or so pick it up and gently move it around and it will make those wrinkles that you can see!!!! Isn't that awesome! You never thought you would want that elephant skin/wrinkles in your fondant, but now you do!
I also used the tip 12 on some of the hands to accent the knuckles. See the picture below.
finish letting it dry for at least a day before you color it so it doesn't come out of position while you are coloring it. And make sure you handle them very carefully. Work with the lighter colors to the darker ones. First thing I did was use the Daffodil petal dust with the big puffy brush to get it all over. Then I used the big brush with the Sage petal dust. You want to make sure the sage gets in some of the wrinkles to add more accent to the hands. Then I used the Cocoa and the Charcoal only in the wrinkles and the wounds, well maybe a little here and there as well to make the hand look a little dirty. Then I painted the fingernails white and immediately put some Cocoa or Charcoal on the tops of the nails so it would make the nails look dirty. And on some of the hands I put a little bit of red coloring to make them look bloody. And after I put the blood in the wounds I also added some Cocoa and Charcoal in the wounds as well.
Then on some of the hands I put sleeves once I was putting them on the cake. Make sure you use some Cocoa or Charcoal petal dust on the sleeves so they look a little worn and dirty.
See the difference a little petal dust can make??? I love how real they look when you just add a little color.
Have fun making some Zombie hands!


Comments
Post a Comment